Surface roughness parameters
Superficial irregularities (roughness and undulation), dents, parallel grooves, and other characteristic surface features are collectively called “surface textures.” Converting these surface characteristics into numerical measurements is referred to as surface texture parameters. Surface texture parameters are roughly categorized into the profile methods and the areal methods. [1]
A variety of parameters can characterize surface roughness. Areal/field parameters are used to describe the entire measured surface of the sample, whereas feature parameters only consider select points, lines, or areas of the sample. [2] Surface roughness parameters provide more information, and their determination is uniquely enabled by confocal microscopy. ISO 25178 categorizes the 3-D surface parameters into six groups as shown in Table 1. [3] Surface parameters have the symbol S, and volume parameters have the symbol V. The selected area and filtering are not defined by the parameter designation; therefore, the filtering conditions should be stated when reporting a surface parameter. [4]
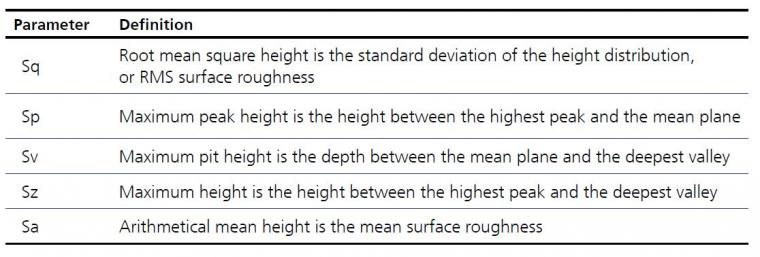
The areal surface height parameters are commonly used to describe the height distribution or the unevenness of a surface, and select parameters are presented in Table 2. Height parameters are calculated using the distribution of height information from the measurement. [2] Therefore, lateral features are not captured by these parameters, but can be described by other parameters in Table 1. [4]
![Table 1: ISO 25178 roughness parameters. Adapted from Ref. [3].](/media/story_section_image/138/img-01-tab-1.jpg)

References:
[1] Introduction to Surface Roughness Measurement, Olympus Corporation, Tokyo, Japan, 2020, pp. 1-48.
[2] F. Blateyron, The Areal Field Parameters, 2013, 15-43.
[3] F. Marinello, A. Pezzuolo, Application of ISO 25178 standard for multiscale 3D parametric assessment of surface topographies, IOP Conf. Ser.: Earth Environ. Sci., 2019, 275 012011.
[4] S. Stach, W. Sapota, Z. Wróbel, Ş. Ţălu, Assessment of possibilities of ceramic biomaterial fracture surface reconstruction using laser confocal microscopy and long working distance objective lenses, Microsc. Res. Tech., 2016, 79 385-392.
Source: Preview Image: donatas1205/Getty Images


